Need to take a picture on your Windows computer? Taking screenshots in Windows 10, Windows 11, and Windows 8 is easy and quick. You can capture an image of the entire display, a window, or just a portion of it. This Post will show you how to screenshot any part of your Windows desktop using keyboard tools and the built-in Snipping Tool app.
How To Screenshot On Windows?
We’ll show you how to take a picture on Windows in a simple, step-by-step way below. You can take pictures quickly and easily using these ways, whether you want to grab the whole screen, a specific window, or a certain part. Following these steps, you can take and save pictures quickly, making it easy to share or save important information, images, or moments on your Windows device.
1. Take A Quick Picture Of The Whole Screen
1. Go to the screen you want to take a screenshot of. When you take a picture of the whole screen, everything that’s open will be saved. Close any windows that you don’t want to be available.
2. Look on your computer for the Print Screen key. If you don’t count the number pad, the Print Screen key is most often in the top right corner of the computer.
- Most of the time, the Print Screen key will be called “PrtSc” or something close.

3. Take a picture of the screen. You have two ways to take a picture of your whole screen:
- Save the picture as a file right away: At the same time, press the Windows key and the PrtSc key. This saves your photo to your Pictures folder in the Screenshots folder as a PNG file. When this key combo is pressed, the screen may quickly go dark to show that a screenshot was taken.
- Copy the image to be able to paste it: If you only press the Print Screen key, the screen will be copied to the PC’s clipboard. You can right-click where you want to paste the picture and choose Paste.
4. Find the picture. If you took the image by pressing Windows + Print Screen, here’s how to find the file:
- Press the Windows key and the letter E on your computer to open File Explorer.
- If you see a folder on the left called Pictures, click it. If not, click This PC, then double-click the Pictures folder.
- Double-click on the folder called “Screenshots.”
- The name of each picture you take is “Screenshot (number).” Depending on the version of Windows you are using, the file name will either end with the number of pictures you have taken or the date and time when the screenshot was taken.
2. Take A Picture Of Just A Single Window On The Screen
1. Click on the window you want to take a picture of. If you only want to take a picture of one window, click anywhere on that window. Make sure that the window is in front of all your other windows.
2. Press and hold Alt and then press PrtScr. This takes a picture of the window and copies it to the clipboard. You won’t be able to tell that the screenshot was taken.
- When you use the print screen on some Windows computers, you must also hold down the Fn key.
3. Open Paint. All Windows computers come with this tool already set up. To open it:
- To bring up the search bar, press the Windows key + S.
- Type paint.
- Tap Paint.
4. To paste the image, press Ctrl+V. Your one-window picture will now be in the Paint window.
- You can also copy and paste the picture into other apps like Word or an email. Just open the app you want to paste the image into and press Ctrl + V.
- You can also use this method to copy and paste the picture into any open document, email, or other area.
- Use the Snipping Tool instead of your picture if it doesn’t appear. See Snipping Tool for Windows 11 or Windows 10 and lower.
5. Save the picture you took as an image. Click File, click Save, type in a file name, click a place on the left side of the page and click Save.
- You can change the screenshot’s file type by clicking the “Save as type” drop-down box at the bottom of the window and then picking a different format (like JPEG) from the list.
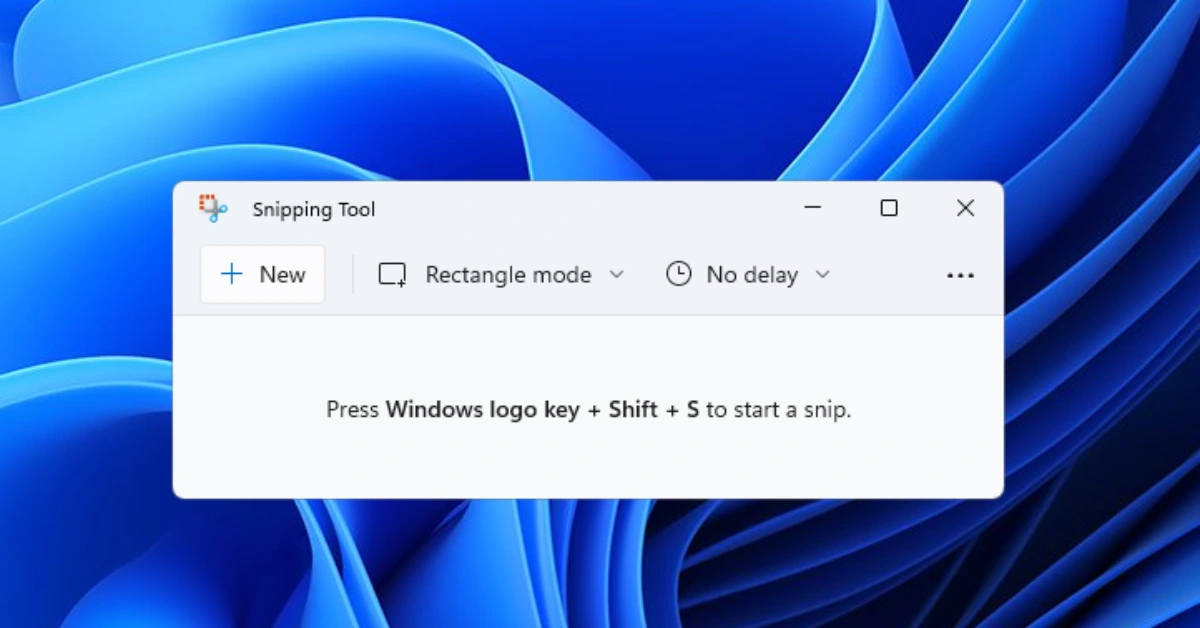
3. Use The Windows 11 Snipping Tool
1. Start up the Snipping Tool. With Windows 11, the Snipping Tool makes it very easy to take and change pictures of the whole screen or just a part of it. To use the tool, click Search in the window, type “snip,” and then click Snipping Tool.
2. Choose a way to take a picture. Click the down button at the top of the screen, the Mode menu. Then pick one of the following:
- You can grab any part of the screen by drawing a square around it in rectangle mode.
- Window mode lets you take a picture of a single window without capturing anything else.
- In full-screen view, everything on the screen is shown.
- Free-form mode lets you take a picture by drawing any shape around a part of the screen.
3. Click + New. It’s in the top right corner of the Snipping Tool.
4. Capture An Image Of Your Display.
- In the square mode, click and drag to make a square around the area you want to record.
- To take a picture in Window mode, click the window you want to record.
- In Full-screen mode, the whole screen is captured right away.
- In Free-form mode, make a border around the part of the screen you want to record.
6. (Optional) Change your picture. If you want to cut out a part of the picture, hit the crop tool at the bottom and choose the part you want to keep. You can also use the other editing tools at the bottom to draw on or remove parts of the picture, which is helpful if you need to hide something.
7. Save your picture. Once you have taken a picture, it is easy to save it:
- Click on the disk picture at the top.
- Choose a place to save the picture.
- Give your file a name, then click Save.
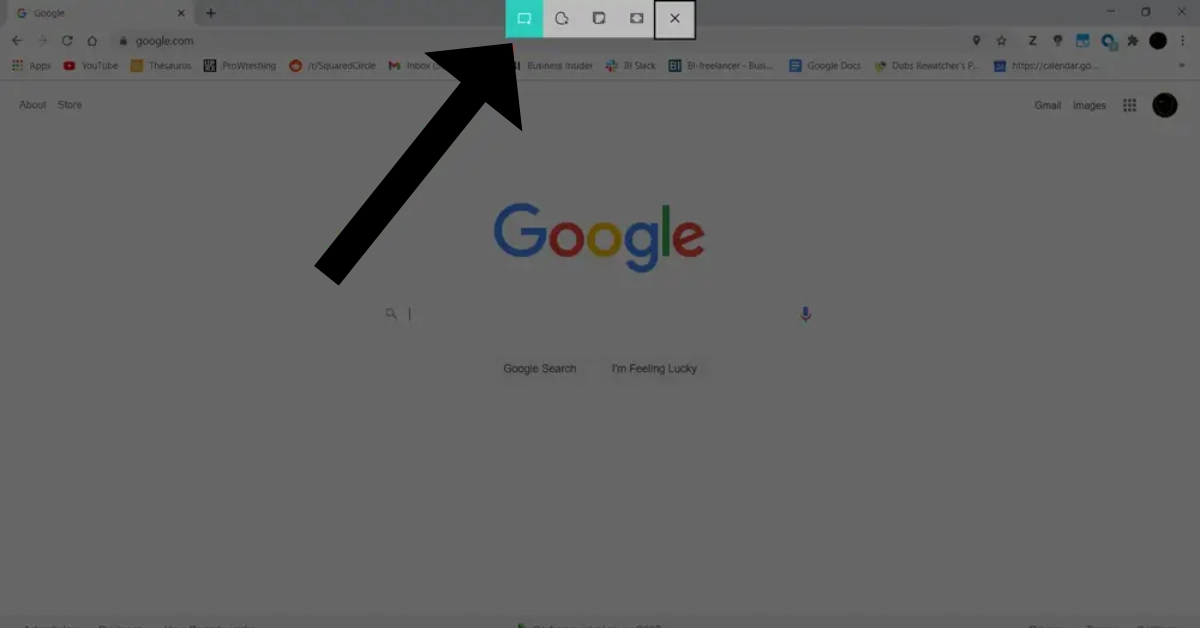
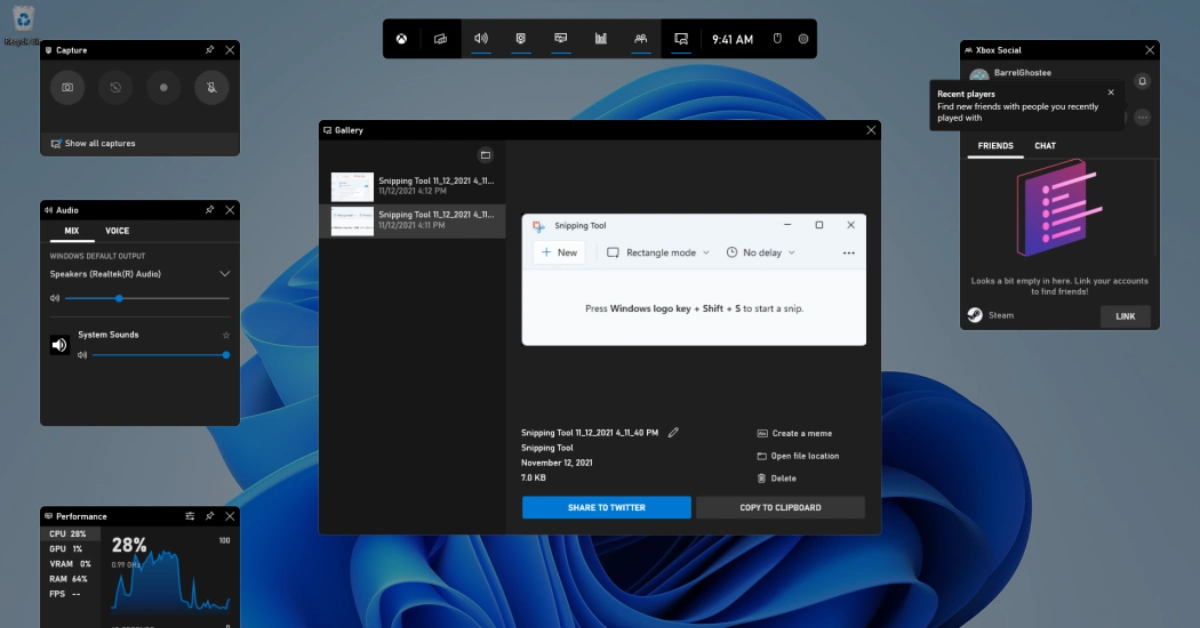
8. Use the shortcut for the Snipping Tool in the future. Now that you know how to use the Snipping Tool, you can use this handy tool the next time you want to take a screenshot: Shift + Windows + S.
- When you press the unique key, a smaller version of the Snipping Tool will appear at the top of the screen. Each button on the Snipping Tool shows a different type of screenshot: Rectangle, Window, Full-screen, and Free-form.
- Click the mode you want to use and press the “Print Screen” button.
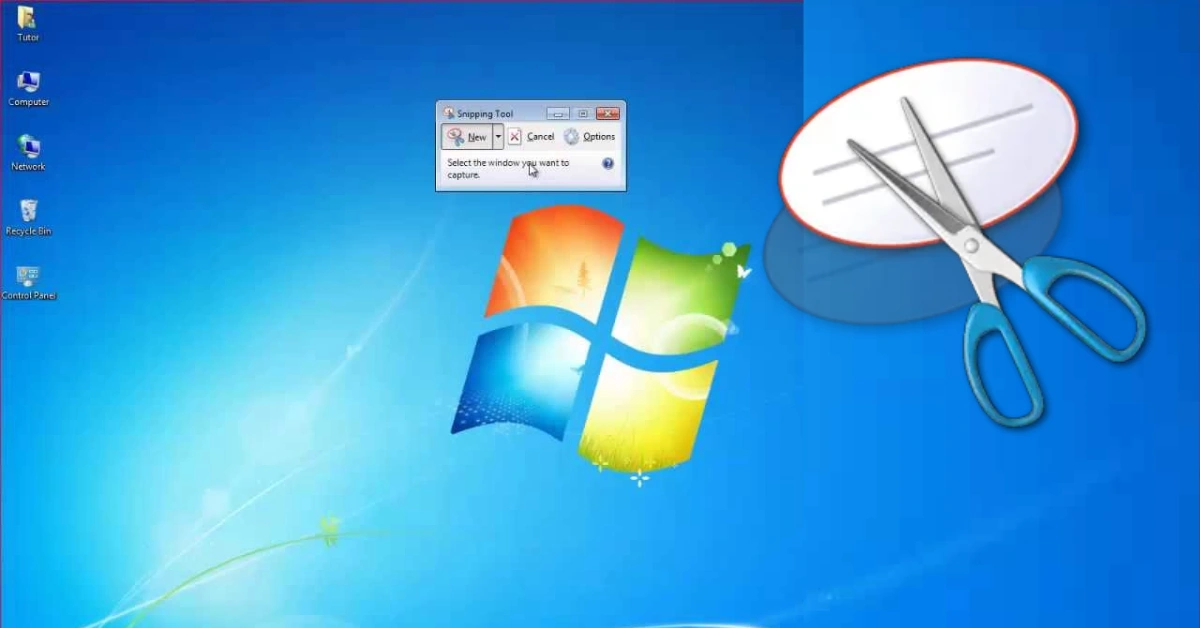
4. Use Windows 10, 8.1, Or 7’s Snipping Tool
1 Start up the Snipping Tool. The Snipping Tool is a great way to take pictures of all kinds of things, like the whole screen, a single window, or a specific part of the screen.
- Press Windows key + S, type “snip,” and click “Snipping tool” on Windows 10.
- Swipe in from the edge of the screen on Windows 8.1, choose Search, type “snipping,” and then choose the Snipping Tool.
- Click the Start button on Windows 7, type “Snipping,” and click “Snipping Tool.”
2. Decide what form the Snip will be. By default, “Rectangular Snip” is picked. To change the shape of the Snip, click the arrow button next to the Mode button.
- Free-form In Snip, you can use your mouse to make any shape you want. Cut out the area inside the shape.
- With Rectangular Snip, you can choose a rectangular spot to cut.
- You can choose which window to cut with Window Snip.
- Full-screen Snip cuts the whole screen, including all windows except the one for the Snipping Tool.
3. Put together a new Snip. To start making a choice, click the “New” button. The screen will fade, and you can draw your Snip area or choose the window if you choose Window Snip. Put down the mouse button to take a picture.
- If you chose Full-screen Snip, your Snip would be made immediately when you click “New.”
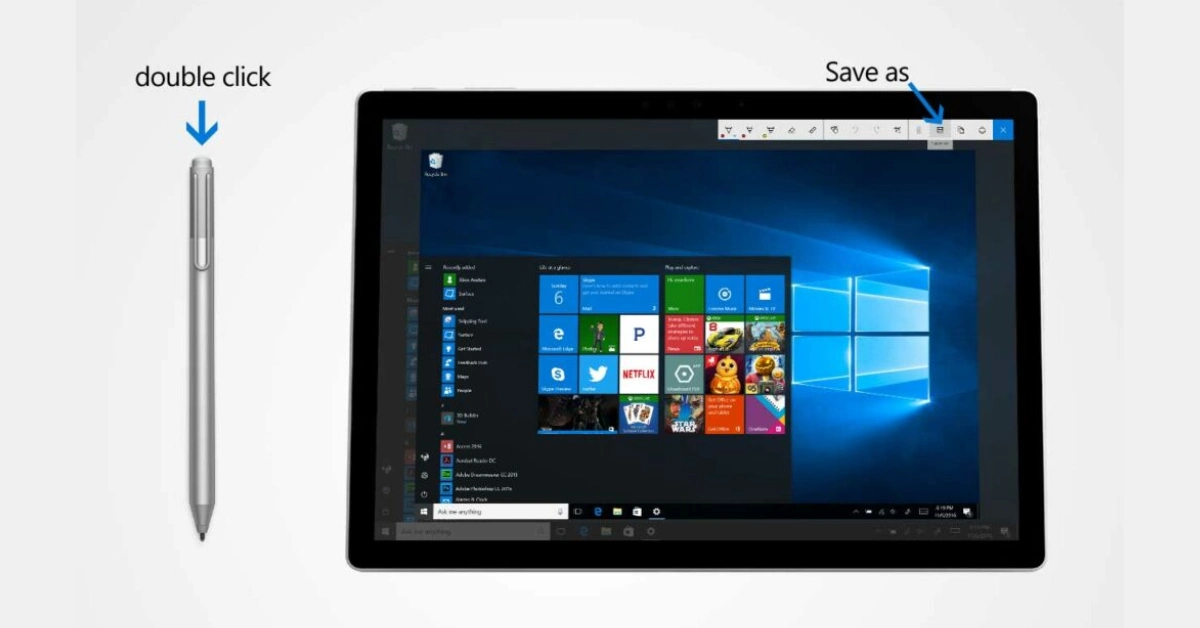
4. Add notes to the Snip if you want to. The Snip will open in a new window once you’ve made it. You can draw on it, make notes with the Pen tool, and call attention to text with the Highlight tool.
- The Erase tool will only remove notes, not the picture itself.
5. Don’t Cut the Snip. Click the floppy disk icon to bring up the save window. You can change the “Save as type:” box and give the picture a name. You can now email or post the image on a website.
- In Windows 8 and later, PNG is the format that is used by default. In older versions, JPG is the file that is used by default.
6. Copy the Snip or save it. By default, when you make a Snip, a copy of it is put on the clipboard. This means you can copy it and put it into Paint or Word, just like you would with a picture of the whole screen. You can make more changes in Paint than you can in the text tool in Snip.
- Open a window that lets you paste and press Ctrl+V to paste the Snip.
5. Take A Picture Of A Game Or App’s Screen
1. Start up the Xbox Game Bar. The Game Bar is a useful tool that makes it easy to take pictures of games and any other windows that are open on your computer. Press the Windows key and the G key simultaneously to open the tool.
- You can even record your screen in real-time with the Xbox Game Bar.
2. Select Widgets from the menu. In the Game Bar at the top of the screen, it’s the second button from the left.
3. Click Capture. This will be close to the top of the choices. The icon called “Capture” will show up.
4. To use the Capture tool, click the pushpin button. This “pins” the tool to your screen to stay there even if you leave the page.
5. Click the window you want to take a picture of. Any single window on your screen, like your web browser, a game, or a text, can be captured.
6. On the Game Bar, click the camera button. This takes a picture of the active window and saves it to the place you have for screenshots.
7. Click See my pictures to see what you’ve taken. At the bottom of the Capture window, you’ll find this choice. Here are all the images you have taken using the Game Bar.
- Follow these steps to remove the Capture app when you’re done taking screenshots:
- To get back to the Game Bar, press the Windows key + G.
- Click the little pushpin.
- Anywhere on the screen will work.
Check out our other step-by-step guide to make tasks easy:
6. Windows Tablet Screenshot
1. Hold down the Windows badge and press it. This is not the Windows button on your PC; it’s the logo on the tablet’s border.
- Press the Power button if the tablet doesn’t have a Windows button.
2. Press the Volume Down button (or Volume Up if you’re using the Power button). When a picture is made, the screen will go dark momentarily.
- Your picture will be saved in the Screenshots folder. To get there, open File Explorer, go to Pictures and then click on Screenshots.
If you found this post informative, then make sure to bookmark our website, thecurrent-online.com, for more such helpful content.